Support
Can’t find the answer to your question in our FAQ or in our manuals and guides? Click the button below, or send an email to support@wordfinder.com. Once you’ve sent us your request, your case will be registered in our system and we’ll contact you as soon as possible.
If you have questions about our assortment, your subscription or your agreement, you’re welcome to contact our customer service department using the customer service form.
How-to Guides
WordFinder Unlimited with Personal Accounts (WordFinder IDs)
WordFinder Unlimited with Azure AD Federation
WordFinder Unlimited with SAML Federation
FAQ
WordFinder for Mac can read your legacy dictionaries. The files (*.lexikon/*.ulex) must be placed in the folder:
- ~/Library/Application Support/WordFinder/lexica/legacy
Note: The path is invisible per default. Make it visible in Finder by pressing:
- Cmd + .
When you use WordFinder for Mac the next time the dictionaries will be opened. You can follow the progress during the process.

You can use the application as usual while the dictionaries are being opened. Once opened, the dictionaries are ready to use. You can then use them just like any other dictionary.
Legacy dictionaries are indicated by a green dot in the dictionary menu (top left menu of the application). Note: downloaded WordFinder Unlimited dictionaries are indicated by a green dot as well.
![]()
*) Legacy dictionaries are dictionaries that you once purchased to use in our classic application, WordFinder 11 Pro. These dictionaries have the extension *.lexikon. We also count user dictionaries created in WordFinder 11 Pro as legacy dictionaries. They have the extension *.ulex.
To download and install a new version of WordFinder for Mac, please follow these steps.
- Visit the Downloads page.
- Download WordFinder for Mac.
- Run the WordFinder for Mac Installer.
- Accept the license agreement.
- Drag WordFinder.app to Applications when asked to.
- Open WordFinder. Answer “yes” if you are asked if you are sure you want to open it.
- Sign in to WordFinder for Mac using your WordFinder account.
The first time you open WordFinder for Mac you must complete the setup of the application.
Enable the hotkey.
You have to grant accessibility access for the application to enable the hotkey. When you open WordFinder for the first time you will see this popup window:
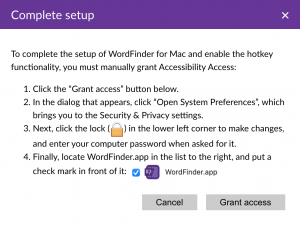
Please follow the instructions to enable the hotkey.
Activate dicationaries
You have to choose the dictionaries you want to use in the application.
- Navigate to Dictionaries under the Settings menu (cogwheel icon).
- Select the dictionaries you want to use.
- Return to the main application page.
Your setup is now complete, and WordFinder is ready for use.
Translation using WordFinder Translator is paid for with credits. A (one) WordFinder Translator credit corresponds to one character in the source text. Every time you enter a text into the source text box the number of characters will be calculated and deducted from the remaining number of credits. The remaining credits are displayed below the source text box:
![]()
A file translation always costs at least 50,000 credits. If the file contains more characters than that, the corresponding additional credits are deducted from the remaining credits. You can always buy additional credits. For more information please contact support[add]wordfinder.com.
WordFinder Translator is a secure machine translation tool for translating phrases and longer texts. It’s available in more than 30 languages and is integrated in WordFinder for Mac. It can be used either by entering the text to be translated manually in the source text box in WordFinder Translator or by transferring text from a document to the source text box using the WordFinder hotkey (default Ctrl + W). The translation in the selected target language will be displayed immediately in the target text box.
If you don’t have WordFinder Translator, simply upgrade to the latest version of WordFinder for Mac.
Supported languages:
Bulgarian, Chinese, Czech, Danish, Dutch, English, Estonian, Finnish, French, French, German, Greek, Hungarian, Indonesian, Italian, Japanese, Korean, Latvian, Lithuanian, Norwegian, Polish, Portuguese, Romanian, Russian, Slovak, Slovenian, Spanish, Swedish, Turkish, Ukrainian
Yes, you can. You have to create it through import. The import file must be in one of our supported formats. We support Excel, WFCML (traditional WordFinder import format) and TBX.
The import file may hold terminology data in multiple languages. However, you can only import data for two languages simultaneously: one source language and one target language. Importing data for more than two languages simultaneously is not supported. If it’s not evident which two languages are intended for import into the dictionary, it must be explicitly specified.
Follow these steps to import a dictionary:
- To import a dictionary, click Import dictionary on the Settings menu, which you access by clicking on the cogwheel icon in the upper right corner:

The Import dictionary dialog box opens:
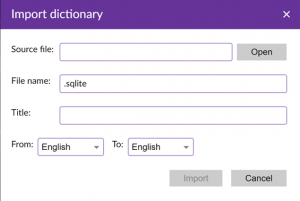
- Click Open to browse for the dictionary source file. The source file must comply with the supported import formats.
- Enter a suitable file name for your dictionary file.
- Enter a name for your dictionary. The name is the dictionary title which will be shown in WordFinder.
- Check if the source and target languages are correct. If not, find the correct source and target languages on the drop down lists.
- Click OK to start the import.
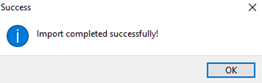
- The new dictionary file will be saved on the computer in the following folder:~/Library/Application Support/WordFinder/lexica/privateWhen the import is completed a message will appear to indicate that the import has finished:
- The new dictionary will be active and available for use immediately after import.
If you want WordFinder for Mac to always be available you can use the option Keep in Dock.
Just go to Applications to open WordFinder for Mac. Right-click the WordFinder for Mac icon in Dock and select Keep in Dock.
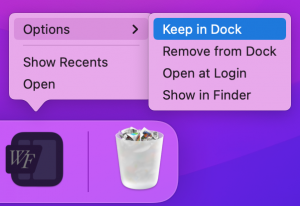
Now the WordFinder for Mac application will always be in Dock, ready for you to use it.
Yes, you can. Once WordFinder for Mac has been started, it can be activated (brought to the front) at any time by a keyboard combination (hotkey), which by default is set to Ctrl + W. You can always change the hotkey setting by selecting “Preferences” on the settings menu. Here you can define which new keyboard combination should be used to activate WordFinder for Mac. The default key combination is displayed as Ctrl + W in the text box.
To see valid key combination options for the hotkey please click the infomation icon in “Preferences”, see picture below.

Yes, you can search for a word directly from the application you are using, for example Microsoft Word.
- Highlight the word you wish to translate.
- Activate WordFinder for Mac using the defined hotkey. N.B. The default hotkey is set to Ctrl + W. You can always change the hotkey setting by selecting “Preferences” on the settings menu.
WordFinder searches automatically through the headword index to display explanations, translations, synonyms etc. in the entry window.
System requirements
macOS High Sierra or later.
At least 4 GB of RAM.
At least 1 GB free hard disk space. Note: More if either many or large dictionaries are downloaded.
The latest version of the program, version 2.4.1, supports both Intel and Apple Silicon processors.
No, all upgrades to WordFinder for Mac and the dictionaries you subscribe to are included in your subscription.
If you frequently select the same set of dictionaries, you can choose to save them as a group. Select at least two dictionaries, and click on the plus button at the top of the dictionary menu, in order to create a group:
![]()
In the dialog that appears, you may then give a name to the group. You can adjust which dictionaries shall be included in the group by dragging them to and from the list of included dictionaries. Their order in the list controls in which order the dictionary articles will be presented when a headword is selected which occurs in more than one of the included dictionaries.
How to create shortcuts to dictionaries or groups
You can set a keyboard shortcut which you may use to quickly select a dictionary or a group. Activate ”Edit groups and shortcuts” at the top of the dictionary menu and select a dictionary or a group by clicking on one of the pen icons:
![]()
In the dialog that appears, you may then select a keyboard shortcut.
Yes, you do – but not all the time. When you install WordFinder for Mac you can choose to download your activated dictionaries. Then everything is installed locally and you can use WordFinder OFFLINE. You have to be online at least once a week to verify the license.
You need to download the dictionaries to your computer.
Please follow these steps:
- Open WordFinder for Mac and click “Dictionaries” on the Settings menu, which you access by clicking on the cogwheel icon in the upper right corner:
![]()
- Search for the dictionary you want to download.
- If you wish to make a dictionary available offline, press the cloud icon at the right of the dictionary title:
![]()
NOTE: If the dictionary was not selected before downloading, it will be selected automatically when you start the download.
- Once the download is finished this symbol is displayed:
![]()
You can now work in the dictionary offline.
Open WordFinder for Mac and click “About” on the Settings menu, which you access by clicking on the cogwheel icon in the upper right corner:
![]()
Here you can see which version you have.
You can create your own menu entries which contain links to web pages in WordFinder for Mac. That is useful if you frequently visit certain web pages.
Open WordFinder for Mac and click “Preferences” on the Settings menu, which you access by clicking on the cogwheel icon in the upper right corner:
![]()
To add a menu link, click the plus sign in the “Custom menu links” field to open the edit window:
![]()
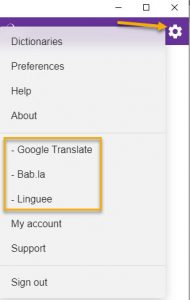
Each entry must consist of a title and an address (url). Click OK to saves the changes. In the picture below 3 menu items have been added to the main menu:
– Google Translate
– Bab.la
– Linguee
Please go to our support page for the Classic versions for more information.
Installation
For users installing software themselves.
To download and install a new version of WordFinder for Windows, please follow these steps.
- Visit the Downloads page.
- Download WordFinder for Windows.
- Run the WordFinder for Windows Installer.
- Approve the license conditions.
- Follow the instructions on the screen to complete the installation.
To complete the setup you need to activate a number of dictionaries you want to use.
Activating the dictionaries
- Sign in to WordFinder for Windows using your WordFinder account.
- Navigate to Dictionaries under the Settings menu (cogwheel icon).
- Select the dictionaries you want to use.
- Return to the main application page.
Your setup is now complete, and WordFinder is ready for use.
WordFinder Translator is a secure machine translation tool for translating phrases and longer texts. It’s available in more than 30 languages and is integrated in WordFinder for Windows. Change to WordFinder Translator by clicking the translation icon in the upper right corner:
![]()
The interface:
![]()
WordFinder Translator can be used either by manually entering text to be translated in the source text box or by transferring the text from a document to the source text box using the WordFinder hotkey (default LeftCtrl + LeftShift). The translation in the selected target language will be displayed immediately in the target text box.
Supported languages:
Bulgarian, Chinese, Czech, Danish, Dutch, English, Estonian, Finnish, French, French, German, Greek, Hungarian, Indonesian, Italian, Japanese, Korean, Latvian, Lithuanian, Norwegian, Polish, Portuguese, Romanian, Russian, Slovak, Slovenian, Spanish, Swedish, Turkish, Ukrainian
Translation using WordFinder Translator is paid for with credits. A (one) WordFinder Translator credit corresponds to one character in the source text. Every time you enter a text into the source text box the number of characters will be calculated and deducted from the remaining number of credits. The remaining credits are displayed below the source text box:
![]()
A file translation always costs at least 50,000 credits. If the file contains more characters than that, the corresponding additional credits are deducted from the remaining credits. You can always buy additional credits. For more information please contact support[add]wordfinder.com.
The only way to create a user dictionary is through import. The import file must be in one of our supported formats. We support Excel, WFCML (traditional WordFinder import format) and TBX.
The import file may hold terminology data in multiple languages. However, you can only import data for two languages simultaneously: one source language and one target language. Importing data for more than two languages simultaneously is not supported. If it’s not evident which two languages are intended for import into the dictionary, it must be explicitly specified.
Follow these steps to import a dictionary:
- To import a dictionary, click Import dictionary on the Settings menu, which you access by clicking on the cogwheel icon in the upper right corner:
The Import dictionary dialog box opens:
- Click Open to browse for the dictionary source file. The source file must comply with the supported import formats.
- Enter a suitable file name for your dictionary file.
- Enter a name for your dictionary. The name is the dictionary title which will be shown in WordFinder.
- Check if the source and target languages are correct. If not, find the correct source and target languages on the drop down lists.
- Click OK to start the import.
- The new dictionary file will be saved on the computer in the following folder:
C:\Users\%username%\AppData\Roaming\WordFinder\lexica\private
When the import is completed a message will appear to indicate that the import has finished:
- The new dictionary will be active and available for use immediately after import.
WordFinder for Windows can read your legacy dictionaries*) if they are placed in one (or more) of the folders mentioned below.
1.
Your legacy dictionary files (*.WFD, *.WFI/ *.WED, *.WEI) can be placed in either of the following default folders:
- C:\users\%username%\appdata\roaming\WordFinder\lexica\legacy
- C:\Program Files(x86)\WFwin
Note: %username% = your personal Windows folder/personal profile. The folder has the same name as your Windows login.
If the dictionary files are placed in one of these folders (or both) WordFinder for Windows will read them automatically.
2.
- If you have or had an installation of WordFinder 11 Pro on your computer, the legacy dictionary files can be placed in the folder(s) you defined in WordFinder 11 Pro. NOTE: Your configuration file for WordFinder 11 Pro must remain on your computer, which is default even after uninstalling the software.
To open the dictionaries in WordFinder for Windows, simply open the application. It will take some time when you open them in WordFinder for Windows for the first time. You can follow the progress during the process.
You can use the application as usual while the dictionaries are opened. Once the dictionaries are open, you can use them just like any other dictionary. They are indicated by a green dot in the dictionary menu (top left menu of the application). Note: downloaded WordFinder Unlimited dictionaries are indicated by a green dot as well.
![]()
*) Legacy dictionaries are dictionaries that you once purchased to use in our classic application, WordFinder 11 Pro. These dictionaries have the extensions *.WFD and *.WFI. We also count user defined dictionaries created in WordFinder 11 Pro as legacy dictionaries. They have the extensions *.WED and *.WEI.
WordFinder 11 Professional (desktop) application for Windows will be removed from WordFinder Unlimited on December 31, 2022. This means that the application will stop working at the turn of the year.
We have spent a lot of time to develop a new desktop application for Windows. Users are adviced to download the new version of WordFinder for Windows.
How this will affect your organization:
We launched WordFinder for Windows in 2020. If you still use the classic application, WordFinder 11 Professional, we recommend that you download the new application, WordFinder for Windows, and start using it.
For questions, please contact our support at support@wordfinder.com.
If you want WordFinder for Windows to always be available you can add it to Autostart.
Press the key kombination Win + r.

Enter the text shell:startup and click OK.
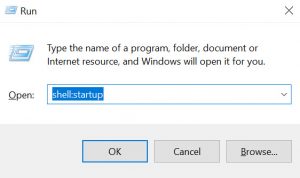
Drag a copy of the application shortcut to the folder.
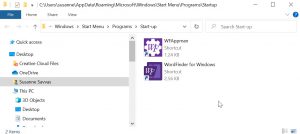
Next time you start your PC WordFinder for Windows will start up automatically.
Yes, you can. Once WordFinder for Windows has been started, it can be activated (brought to the front) at any time by a keyboard combination (hotkey), which by default is set to Left Ctrl + Left Shift. You can always change the hotkey setting by selecting “Preferences” on the settings menu. Here you can define which new keyboard combination should be used to activate WordFinder for Windows. The default key combination is displayed as LeftCtrl + LeftShift in the text box.
To see valid key combination options for the hotkey please click the infomation icon in “Preferences”, see picture below.

Yes, you can search for a word directly from the application you are using, for example Microsoft Word.
- Highlight the word you wish to translate.
- Activate WordFinder for Windows using the defined hotkey. N.B. The default hotkey is set to Left Ctrl + Left Shift. You can always change the hotkey setting by selecting “Preferences” on the settings menu.
WordFinder searches automatically through the headword index to display explanations, translations, synonyms etc. in the entry window.
System requirements
Windows 7 or later, 64 bits version.
At least 4 GB of RAM.
At least 1 GB free hard disk space. Note: More if either many or large dictionaries are downloaded.
No, all upgrades to WordFinder for Windows and the dictionaries you subscribe to are included in your subscription.
If you frequently select the same set of dictionaries, you can choose to save them as a group. Select at least two dictionaries, and click on the plus button at the top of the dictionary menu, in order to create a group:
![]()
In the dialog that appears, you may then give a name to the group. You can adjust which dictionaries shall be included in the group by dragging them to and from the list of included dictionaries. Their order in the list controls in which order the dictionary articles will be presented when a headword is selected which occurs in more than one of the included dictionaries.
You can set a keyboard shortcut which you may use to quickly select a dictionary or a group. Activate ”Edit groups and shortcuts” at the top of the dictionary menu and select a dictionary or a group by clicking on one of the pen icons:
![]()
In the dialog that appears, you may then select a keyboard shortcut.
Yes, you do – but not all the time. When you install WordFinder for Windows you can choose to download your activated dictionaries. Then everything is installed locally and you can use WordFinder OFFLINE. You have to be online at least once a week to verify the license.
Please follow these steps to make the dictionaries available offline:
- Open WordFinder for Windows and click “Dictionaries” on the Settings menu, which you access by clicking on the cogwheel icon in the upper right corner:
![]()
- Search for the dictionary you want to download.
- If you wish to make a dictionary available offline, press the cloud icon at the right of the dictionary title:
![]()
NOTE: If the dictionary was not selected before downloading, it will be selected automatically when you start the download.
- Once the download is finished this symbol is displayed:
![]()
You can now work in the dictionary offline.
Open WordFinder for Windows and click “About” on the Settings menu, which you access by clicking on the cogwheel icon in the upper right corner:
![]()
Here you can see which version you have.
You can create your own menu entries which contain links to web pages in WordFinder for Windows. That is useful if you frequently visit certain web pages.
Adding a link to a web page to the applications main menu (the settings menu under the cogwheel icon) must be configured in a separate file, customization.json. Download example file and edit the file according to your needs here:
The picture below shows the contents of the example file.
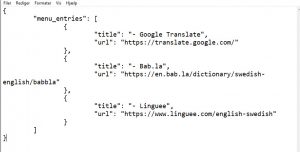
Each entry consists of a title and an address (url). In the file there are 3 menu entries:
- – Google Translate
- – Bab.la
- – Linguee
To change an item, make sure to change both the title and the url in the file.
NOTE don’t make any syntax changes in the file. All brackets, commas, colons and quotations marks must stay exactly as they are.
When you are done, save the file in the user’s profile in this folder:
C:\users\%username%\AppData\Roaming\WordFinder*)
*) %username% is your Windows username
NOTE it’s important not to make any changes to the file name when you save the file.
Next time you open WordFinder for Windows the menu entries will appear in the settings menu. The entries in the example file will look like this in WordFinder for Windows:
When you subscribe to WordFinder our Android, iPhone and iPad are included in your subscription.
Via the apps you have access to all the dictionaries you have in your subscription.
You can download the WordFinder App in the App Store or Google play.
When you launch the app for the first time you’ll need to sign in with your WordFinder ID (username and password).
I you can’t find WordFinder for Android in Google Play, you can go to the store from here instead. The link below will take you directly to the WordFinder app:
Google play.
WordFinder Chrome Extension is included in your subscription and can be used in Chrome and Edge.
With WordFinder Chrome Extension you have access to all the dictionaries you have in your subscription, and you can look up words in WordFinder’s dictionaries directly from any web site.
You can download the extension from Chrome Web Store.
When you launch the extension for the first time you’ll need to sign in with your WordFinder ID (username and password).
You can order your subscription with the number of user licenses you want directly in our web store. We accept Visa and Mastercard.
If you pay for your subscription by credit card, you can purchase additional translation credits directly from your account.
- Open your web browser and login to app.wordfinder.com
- Click the Settings-menu (the cog-wheel)
- Click My account
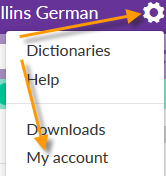
- Go to the Translation tab. On this tab you can see how many credits you have left and buy new ones.
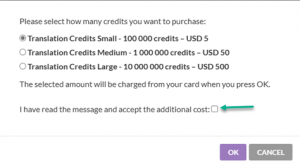
To buy additional Translations Credits, click on the Add Credits button:
![]()
On the pop-up page that appears, you can choose how many credits you want to purchase. Confirm that you have read the message and accept the cost.
If you pay by invoice or if your company or organisation manage and pay for your account, please contact your local WordFinder administrator. Your local administrator must contact sales@wordfinder.com to buy additional credits for your company or organisation.
No, all upgrades to the software and the dictionaries you subscribe to are included in your WordFinder Unlimited subscription.
All credit card information is handled by our Payment Service Provider Partner – Nets A/S, which is one of Scandinavia´s largest service providers for online credit card payments. Nets is certified according to the latest requirements of the PCI DSS standard (Payment Card Industry – Data Security Standard), which the largest credit card issuers, including Visa and Mastercard, have developed. In this way you may be sure that credit card information is handled in a safe way in a secure environment
Credit card details are never stored at WordFinder but in the external Nets system.
Please verify that your card meets the following requirements:
- 3D Secure must be activated. 3D Secure is branded by Mastercard and Visa as: Mastercard SecureCode and Verified by Visa.
- The card must be open for Internet purchases in the EU.
- The card must accept recurring transactions.
- Login to app.wordfinder.com
- Click the Settings-menu (the cog-wheel)
- Click My account
- Go to the Payment tab. Here you can update your credit card information.
Please verify that your card meets the following requirements:
- 3D Secure must be activated. 3D Secure is branded by Mastercard and Visa as: Mastercard SecureCode and Verified by Visa respectively.
- The card must be open for Internet purchases in the EU.
- The card must accept recurring transactions.
If you have paid with credit card you shall cancel your subscription on your account page. We hope you will restart your subscription soon! 🙂
- Login to app.wordfinder.com
- Click the Settings-menu (the cog-wheel)
- Click My account
- Go to the Subscription tab. Click the Change button and then CANCEL SUBSCRIPTION

If you have paid with credit card you can reactivate your subscription on your account page.
- Login to app.wordfinder.com
- Click the Settings-menu (the cog-wheel)
- Click My account
- Go to the Subscription tab. Click the Change button and then RESUBSCRIBE

As a user in an organisation with access to WordFinder via IP verification, a personal account (WordFinder ID) enables you to log in and use WordFinder when you are not connected to your organization’s network. With a WordFinder ID, you can work from any computer you like, from a smartphone or tablet and in our Desktop applications.
You can pay with Visa and Mastercard.
Your card needs to:
- Have 3D Secure activated. 3D Secure is branded by Mastercard and Visa respectively as: Mastercard SecureCode and Verified by Visa.
- Be open for Internet purchases in the EU.
- Accept recurring transactions.
Your browser needs to have JavaScript enabled for the checkout and card verification to work.
Please note that when you start a trial, your card needs to be authorised, which means that 1 unit in your currency, e.g. 1 EUR is reserved on your account, not charged. If you cancel your subscription before the trial ends, you will not be charged anything.
Contact us for other payment options.
- Login to app.wordfinder.com
- Click the Settings-menu (the cog-wheel)
- Click My account
- Go to the General tab. Click the button DELETE ALL MY ACCOUNT DATA

Yes, you can. If you need to run WordFinder on a desktop computer and a laptop for example, you can do so. This is in compliance with the license agreement as long as you are the one using both computers.
Yes, you do – but not all the time. When you download WordFinder for Windows or Mac with your activated dictionaries, everything is installed locally and you can use WordFinder just as before. You can be offline for up to one week without being online. But you have to go online at least once a week to renew your offline access.
If you want to search via WordFinder’s web interface or use the apps for smartphones and tablets, you will need an Internet connection.
As a WordFinder Unlimited subscriber you pay in advance of the service period with credit card. We accept the following cards: MasterCard and Visa. The subscription continues either monthly or yearly and the amount per month or year is deducted from the same credit card each month or year until you actively end your subscription under My Account in the Settings menu.
API Base URL
The API Base URL is: https://www.wordfinder.com/api/1.0/public
Generate API Key
Open your web browser and navigate to WordFinder’s website. Sign in using your administrator account credentials.
Once you are signed in, look for “My Account” in the settings dropdown list and click on it. Continue to Advanced Settings. In the advanced settings, you will find a button labeled “Generate API Key”:
![]()
Click on this button to initiate the key generation process. Once the key has been successfully generated, a message will be displayed on the screen, showing your API key:
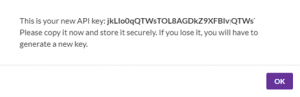
Make sure to save your API key in a secure location. API keys are sensitive credentials and should be kept confidential. You will need this key to access WordFinder’s API services.
Headers and Body in API Calls
Each call should have these custom headers:
“x-api-key”: “yourapikey”
“Content-Type”: “application/json”
“X-Requested-With”: “XMLHttpRequest”
The body should be a JSON object, e.g.:
{
“user”: “anna.svensson@company.com“,
“endDate”: “2023-06-30”
}
Create New User
POST /users: Creates a new user. The required field is ‘user’, and ‘password’ is optional. If a password isn’t provided, or is null, a random password will automatically be generated. When the user is successfully created, the response will be a JSON object including the new password.
Delete User
DELETE /users: Deletes a user. The required field here is ‘user’.
Activate User
POST /users/activate: Activates a user by assigning them a license. Here, ‘user’ is required while ‘endDate’ is optional. The ‘endDate’ parameter, if provided, should be in date format: YYYY-MM-DD.
Deactivate User
POST /users/deactivate: Deactivates a user, thereby freeing up a license. The only required field is ‘user’. On successful deactivation, you’ll receive a 200 status code.
Reset Password
POST /users/reset-password: Resets a user’s password. The required field is ‘user’ while ‘password’ is optional. If ‘password’ isn’t provided, or is null, a random password will be generated.
Generate User List
GET /users/info: Returns a list of all users. There are no required fields for this endpoint.
User Information
POST /users/details: Returns information about a specific user. The ‘user’ field is required here.
Інструкції
Дізнайтеся більше про установку, функції та спосіб отримати максимальну користь від наших продуктів. Персонал відділу ІТ також знайде інформацію про підготовку до експлуатації.
